Search for answers or browse our Knowledge Base.
Guides | Models | Validation | Book
Selecting and Modifying Multiple Wires
AN-SOF allows you to simultaneously edit a group of wires. There are three ways to select multiple wires for editing:
- Using the Selection Box Tool: Drag a rectangular box to select multiple wires.
- Selecting Wire by Wire: Left-click on individual wires while holding the Ctrl key.
- Combination of Both Methods: Use a mix of the Selection Box tool and wire-by-wire selection.
Using the Selection Box Tool
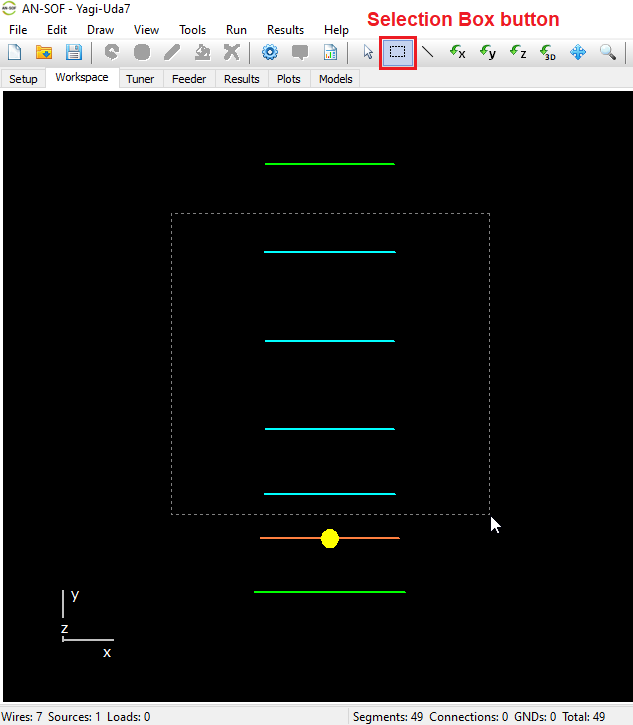
- Click the Selection Box button on the main toolbar.
- Left-click on the workspace and drag a box to select multiple wires (see Fig. 1).
- All wires within the selection box will be highlighted in light blue.
- Dragging the box from top to bottom selects only fully enclosed wires.
- Dragging the box from bottom to top selects partially enclosed wires as well.
- Enclosing already selected wires with the selection box will deselect them.
- To deselect all wires, double-click on the screen or press ESC.
Selecting Wire by Wire
- Click the Select Wire button (arrow icon) on the main toolbar (Fig. 2).
- Hold the Ctrl key and left-click on individual wires to select them.
- To deselect a wire, hold the Ctrl key and click on it again.
- To deselect all wires, double-click on the screen or press ESC.
Wire Selection Methods – Video Tutorial
Watch the video below to learn how to efficiently select and edit wires in your antenna models. This tutorial demonstrates various selection techniques, including the ‘Select Wire’ and ‘Selection Box’ tools, using Ctrl + Left-Click for multi-selection, and combining these methods to streamline your workflow.
Persistent Wire Selections
Wire selections in AN-SOF persist until you explicitly deselect them—by double-clicking or pressing ESC—making it easier to apply consecutive modifications and run simulations between changes without the need to reselect elements. Even after saving and reopening a project, selected wires remain highlighted, allowing you to seamlessly resume editing exactly where you left off.
AN-SOF also includes Undo/Redo functionality, with up to 10 levels of action history. These options are available via the Edit menu and the main toolbar, or using the shortcuts Ctrl + Z (Undo) and Ctrl + Y (Redo). Together with persistent wire selections, this enables a smooth and efficient iterative workflow, where you can make changes, simulate, and refine your model until the desired outcome is achieved.
This process is illustrated in the video below and the accompanying flowchart (Fig. 3), with a detailed explanation provided beneath the diagram.
Step-by-Step Iterative Workflow
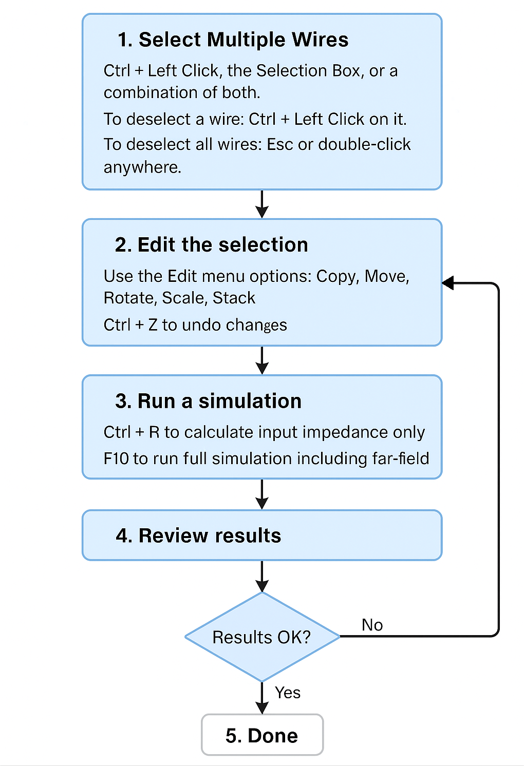
1️⃣ Select Multiple Wires
- Use Ctrl + Left Click, the Selection Box, or both.
- Selected wires are highlighted in light blue.
- To deselect a wire: Ctrl + Left Click on it.
- To deselect all wires: Press ESC or double-click anywhere on the workspace.
2️⃣ Edit the Selection
- Use the Edit menu options: Modify, Move, Rotate, Scale, Copy, Stack.
3️⃣ Run a Simulation
- Press Ctrl + R to calculate input impedance only.
- Press F10 to run the full simulation including far-field results.
4️⃣ Review Results
5️⃣ Continue Editing
- Selected wires remain highlighted after simulation.
- Resume scaling, moving, rotating, etc., without reselecting.
- Use Ctrl + Z / Ctrl + Y to undo/redo changes.
🔁 Iterate as Needed
- Edit, simulate, and fine-tune your model continuously until you achieve the desired result.
🆕 Improved View Adjustments
Modifying the Selected Wires
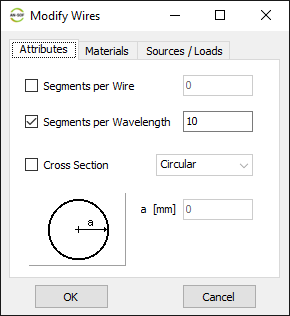
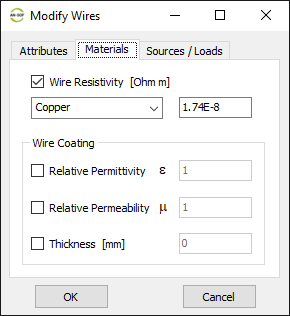
Once multiple wires have been selected, navigate to Edit > Modify in the main menu to modify them. The Modify command opens a dialog box (see Fig. 4) with three tabs: Attributes, Materials, and Sources/Loads. Use the checkboxes to specify which parameters you want to modify.
In the Attributes tab, the Segments per Wire and Segments per Wavelength options allow for bulk editing of wire segments. These options are mutually exclusive:
- Segments per Wire sets a fixed number of segments for all selected wires.
- Segments per Wavelength sets the number of segments for each wire based on its length in wavelengths, using the shortest wavelength corresponding to the highest frequency specified.
Entering “0” (zero) in the Segments per Wire field will automatically set the number of segments for each wire based on 10 segments per wavelength.
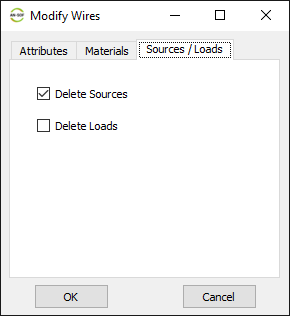
In the Sources/Loads tab, you can remove sources and loads in bulk by selecting “Delete Sources” or “Delete Loads”.
If you need to manipulate the position or arrangement of selected wires—such as moving, rotating, scaling, copying, or stacking them—rather than editing their attributes like the number of segments, cross-section, or material properties, refer to the following articles: